中間テーブルを用いた多対多の関係(その 2)
前回はアソシエーションを定義するところまで進めました。今回はそのアソシエーションを実際に利用してみます。まずはコントローラーから。
rails g controller employees index show
モデルに対応するテンプレートを作成します。
app/views/employees/_employee.html.erb
<table border>
  <tr><th>従業員名</th><td><%= employee.name %></td></tr>
  <tr><th>年齢</th><td><%= employee.age %></td></tr>
  <tr><th>月収</th><td><%= employee.salary %></td></tr>
  <tr><th>性別</th><td><%= employee.sex.name %></td></tr>
  <tr>
    <th>取得資格</th>
    <td><%== employee.licenses.empty? ? 'なし' : employee.licenses.map{ |l| l.name }.join(tag :br) %></td>
  </tr>
</table>
<%== ... %> はタグをエスケープしない記法です。安全が確認されているとき以外は使わないようにしましょう。employee.licenses で、アソシエーションによってひも付いた License のリストを取得できます。
他の View も作ります。
app/views/employees/index.html.erb
<h1>従業員一覧</h1>
<table border>
  <thead>
    <tr><th>従業員 ID</th><th>従業員名</th><th></th></tr>
  </thead>
  <tbody>
  	<% @employees.each do |e| %>
    <tr>
      <td><%= e.id %></td>
      <td><%= e.name %></td>
      <td><%= button_to '詳細', employee_path(e.id), :method => :get %></td>
    </tr>
    <% end %>
  </tbody>
</table>
app/views/employees/show.html.erb
<h1><%= @employee.name %>さんの情報</h1>
<%= render @employee %>
<p><%= link_to '一覧に戻る', employees_path %></p>
ルーティングの設定も忘れずに。
config/routes.rb
Sample2::Application.routes.draw do
  resources :employees
  # (略)
end
Sample2 のところは実際に作ったアプリケーション名に読み替えてください。
サーバを起動して http://localhost:3000/employees にアクセスして確認してみましょう。
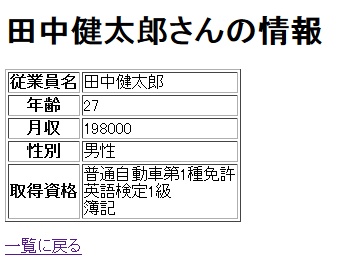
「詳細」ボタンをクリックすると…。
こんな感じになりましたか ?

